Friday, November 27, 2009

How to make a takeout box


Here's a little tutorial I put together in pictures on how to make a takeout box from one sheet of card stock. I will do my best to explain the process so please bear with me. I would use pretty colored card stock, but for this tutorial I though the cream would be less distracting and easier to see.

First you'll want to cut your card stock into 4" sections so you have 3 (4"x12") pieces. cut 2 of these pieces into 4"x9" save the remaining 2 (3"x4") pieces for the top flaps. see photo below.


Next we'll need to score our 4"x12" paper at 1/2" and 4 1/2" on each end. Then score at 1/2" between the
 4 1/2"  and the 7 1/2" score lines.


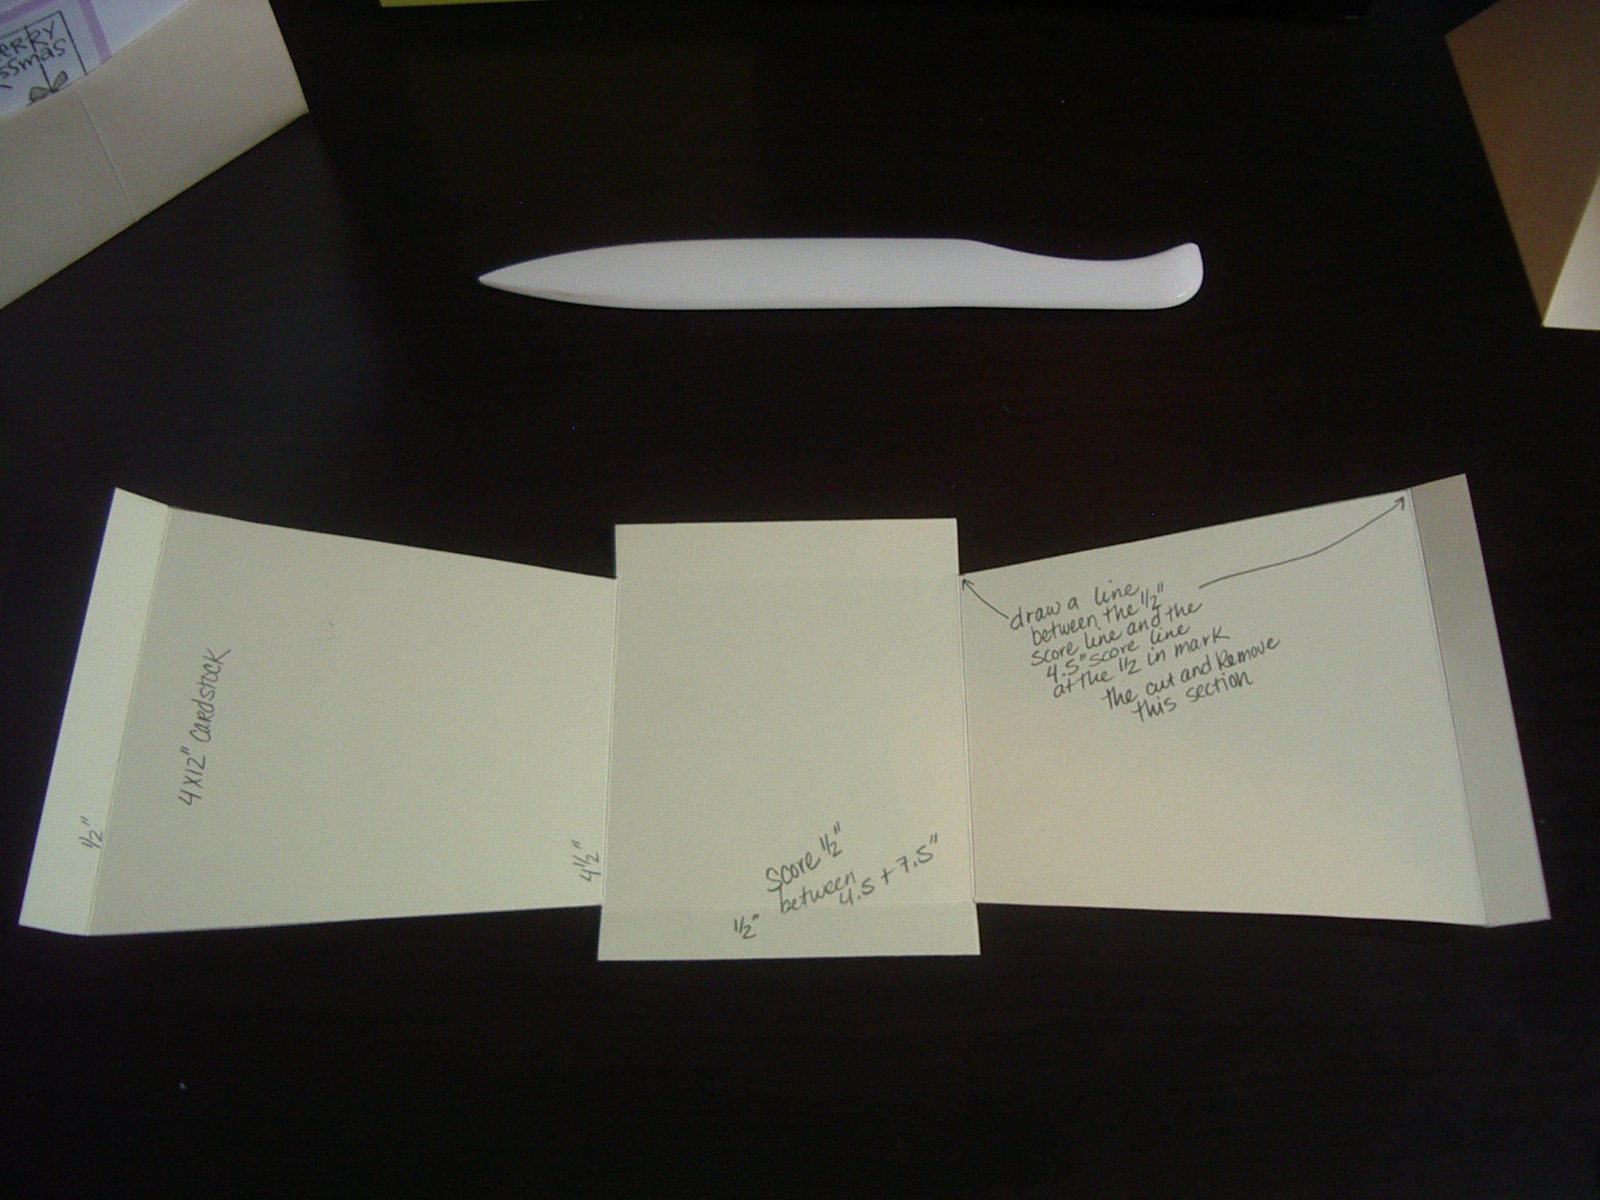
As the photo above shows we've taken our rectangle and trimmed the sides between the 1/2" score line at the ends and the intersection of the 4 1/2" and 1/2" score lines. This creates a slight taper which gives out takeout box it's classic shape. I apologize if this part is unclear, enlarge the photo to see my written marks and better understand the photo. NOTE: be sure to fold your score lines.
Next take your 4"x9"rectangle and make a mark at1 1/4", 2 1/2", 6 1/2" and 7 3/4"  at the top of your card stock. Then at the bottom make a  mark at 3" and 6". Draw a line between the 2 1/2" and 3" marks and then between the 6 1/2" and 6" marks, from top to bottom. see photo below. Then make a mark 1 1/4" from the top corners down the side.

You will cut away where where the photo says to cut away and your piece should look like the next photo.


then fold your score lines. Shown below on the left I have folded the my score lines and on the right I have trimmed the excess at the top.


Next apply adhesive (I recommend sticky strip) as shown in the orange.


assemble as shown...


making sure your flaps are on the outside  (like a takeout box)...


I attached an eyelet using my crop-o-dile, I just went in as far as I could with the 1/8" hole punch and centered it.
Then you'll take the flaps and cut a slit in the center about 1 1/2"-2" long if you would like your box to close differently or don't want to cut the slits you could always seal it with a sticker.
Attach the flaps and string some ribbon about 15" into the eyelets and make a knot to secure.
Fill with goodies and decorate the outside with fun embellishments. Enjoy!
If my directions are unclear please let me know and I'll make a correction.

Sunday, November 1, 2009

Treat boxes...


I made these cute treat boxes for my niece and nephew for Halloween. What I like about these boxes is you can really use them for anything, just select a decorative scrapbook paper to match your needs and you have a birthday or holiday gift box.

The box is a one sheet, no glue, simple fold box that I found on the internet. I Remember making boxes like this as kid in school but had forgotten how so I went to the internet to find directions. I will attach a link here http://www.wikihow.com/Fold-a-Paper-Box to one of the tutorials I found (there are many out there if you don't like these).


Sunday, September 27, 2009

Card two: Tea bag holder

This next card I simply love as it doubles as a little gift or thank you.

As you can see I made mine a birthday card.

The inside holds the surprise; tea bags, love it.
This card was made from K&Company "Urban Rhapsody" designer paper, I really like this paper because it's double sided. I've noticed that more paper out there is being made double sided, which is great for projects like these where you see the other side of the paper. This card idea came from a video I watched by Dawn Griffith on you-tube. Here's the link to the video so you can see for yourself what an awesome stamper she is.
Note: for mine I had to adjust the insert size to fit my tea bags.

Thursday, September 24, 2009

Hoppy Birthday!


No, it's not my birthday. But I have been having some fun making cards for family and friends. There seems to be a lot of Birthdays coming up this fall. I will be adding photo's and descriptions of my cards as I see it's safe to post. Which will most likely be after they've seen the card. Enjoy!

Card one:

This simple card is for my mom's birthday. I just love the unfrogettable stamp set, too cute!

I used paper from the "sweet stack" by DCWV which already had the cute lacy border and ribbon like detailing, which is so pretty it almost looks real. I thought the green paisley background went prefect with the frog.

Sunday, August 16, 2009

Simple Cupcake Card


I made this simple cupcake card for a niece who's turning three. I used pink card stock from the DCWV spring stack. The cute little stripped print came from the sweet mat stack also by DCWV. I stamped the cupcake on white and fussy cut it out, then colored it with pink water color (pencils).I can't forget the dimensional's which make my little cupcake stand out.
I would have left the card at that just simple and elegant; but then I remember she's 3 she needs a few glitter sprinkles and some stickers ( why not ). The end result this cute girl-y handmade card .

Thursday, May 7, 2009

Pretty Princess for a Princess

For Taylie's Birthday

 I made a gift bag with Aurora using my moms circut machine. The cricut is so awesome it does everything.


Here's the card I made using rubber stamps, glitter and a tutorial on U-tube.


Saturday, April 18, 2009

Birthday Cake for my Nephew!

Today and part of yesterday I spent my time making this cake for my nephew's birthday. He'll be one, so happy first birthday to baby Harold.

Friday, April 17, 2009

The Ring 2: more soldered things

Here's my latest creation,
a new soldered ring.
I think it turned out better this time.
And lastly because no solder day is complete without ending up with a pile of stones...
Sometimes you just have to try things to learn if they work or not...

Friday, April 10, 2009

Soldering About...

Here are a few of my first soldering projects that I have been working on.
The first charm I made was the one with the face. The second was the Eiffel Tower.
Here you can see the back sides of the charms.
And lastly the ring, which was just plain playing around. I have no size for it and it actually fits me kind of loose I think if I were to make more I would probably do it a little different.
I am excited to try some other projects with these flat back glass marbles. The wheels in my head are turning as I write this. So I think it's back to the soldering table for me...

Monday, February 9, 2009

My Heart on a String.

This all to cute craft is actually a catnip toy.
and my cat as you can see has enjoyed it very much.
These little beauties are in the process of becoming Valentines for my friends with cats...
As you can see I made a couple of larger ones that are just filled with stuffing (no catnip) for decoration, or that special someone/friend. I made them out of a softer more delicate yarn that I tried out but deciced wasn't cat friendly. Basically I was worried she might eat it. If you want to try this all too cute knitted heart and give it to your special Valentine here's the link.
Happy Hearting.

It's snowing marshmellows!

I simply LOVE these marshmellows...

I made these cute snowflake marshmellows and I now that I have I don't think that I can go back to the store bought variety again.  They were really not any more challenging than making candies at Christmas.  I would definately recomend making your own sometime for a long cool weekend when you want to build a fire, read a book and drink some cocoa. If you cut them into heart shapes they would make for some really specially valentines marshmellows, what a sweet idea. :)