First off you can make your triangles any size you want particularly if you just want to cut and sew a bunch of them together many people call this a thousand pyramids quilt. This is also a very simple tessellation.
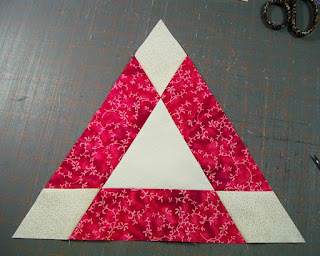
Here's the block I'm going to show you.
For this block I'm starting with a 5" strip of fabric for my base(center) traingle which will make the sides of my triangle 5¾"
I found this ruler at Jo-Ann's it's not very big only goes up to 6"; of course you notice my 5" strip just fits between the lines so that's why I went with 5". Next you'll cut off the right edge using the ruler as your guide then cut at the 5" mark since our strip is only 5". This ruler creates your 60° angles; this process could be done with a long strip of fabric and a regular quilting ruler with the 60° mark.
Now we have a diamond, very familiar if you've made a lone-star or radiant star quilt.
Now we cut the diamond in half. Using a regular quilting ruler I lined the 60° at the top making sure my rulers edge was point to point(as shown) and then cut. Voila two equilateral triangles!
As I said before you could cut up a bunch of these(any size) and make a thousand pyramids quilt.
To make this bordered block I took strips of fabric(which could be any width) mine were 2½" wide because that's what I cut my scraps into. I cut my strips 8¼" long. For one block you need 3.
Next taking my handy 60° diamond ruler I cut each end.
To get the mirror image for the other side of the strip I flipped over my fabric wrong side up. I suppose you could have folded your strip in half and only had to cut once; I'll have to remember that when I make more.
Next I used a fabric similar to my center triangle for the little diamonds. these strips were also 2½" wide and I just used that handy 60° ruler again this time cutting every 2½"
Now were ready for assembly! all your pieces should look like this..
First I sew one side strip to the center triangle. Make sure you have little tips about ¼" at each end; these will be throughout the construction of this block.
Next little diamond to a side strip.
Then two little diamonds to each end of the third side strip.
So far you should have this...
Now we'll sew the side strip with the single diamond.
A little tip: I usually line up my sewing edges and then check to make sure my seams will match up at my ¼" seam allowance by just peeling back the edge as shown below.
Then finally the third side strip with two diamonds.
and then.... Voila!
when you put two together I see our diamond again. These can be sewn into rows making an easy straight seam quilt.
Happy quilting!


No comments:
Post a Comment